画像認識がしたいです。
このような要望にお応えします。
もし、世界を3Dでデジタル表現することが写真を撮影することと同じくらい簡単になれば、ゲーム等を代表とする仮想世界の発展は加速すると思います。そこで、今回は3Dオブジェクト化の技術を試してみたいと思います。
Pixel-aligned Implicit Function(PIFu)
PIFuについて
2019年、2D画像から対応する人物の3Dオブジェクトを効果的に表現可能なPixel-aligned Implicit Function(PIFu)が提案されています。PIFuは、1枚の画像から3次元表面とテクスチャの両方を推論可能なディープラーニング手法です。髪型や衣服などの複雑な形状などを3Dオブジェクト化することが可能です。さらに、人の背中等の画像からは見えない領域を含む部分に関しても高解像度の3D表面を生成することができるとのことです。
PIFuのネットワークアーキテクチャ
ネットワークアーキテクチャは、元論文を参照ください。
- https://arxiv.org/pdf/1905.05172.pdf
そして、2020年「PIFuHD:Multi-Level Pixel-Aligned Implicit Function for High-Resolution 3D Human Digitization」にて提案された手法がGithubにて公開されています。
- https://github.com/facebookresearch/pifuhd
- https://arxiv.org/pdf/2004.00452.pdf
それでは、画像から3Dオブジェクトを生成してみましょう。
Google Colaboratoryの準備
・Googleのアカウントを作成します。
・Googleドライブにアクセスし、「新規」→「その他」から「Google Colaboratory」の順でクリックします。そうすると、Colaboratoryが起動します。
・Colaboratoryが起動したら、以下のコマンドをCoalboratoryのセルに入力し実行します。
そうすることで、Googleドライブをマウントします。
|
1 2 |
from google.colab import drive drive.mount('/content/drive') |
・実行後、認証コードの入力が促されます。このとき、「Go to this URL in a browser」が指しているURLにアクセスしgoogleアカウントを選択すると、認証コードが表示されますので、それをコピーしenterを押します。これでGoogleドライブのマウントが完了します。
PIFuHDの準備
こちら(https://github.com/facebookresearch/pifuhd)で公開されているGoogle Colabを参考にします。
本記事では、以下の手順で実行しました。
Google Colaboratoryの「ランタイム」→「ランタイムのタイプ変更」でGPUを選択します。
ツールをダウンロードする場所に移動します。 本記事では、マイドライブにツールをダウンロードします。
|
1 |
cd drive/My\ Drive |
pifuhdをダウンロードします。
|
1 |
!git clone https://github.com/facebookresearch/pifuhd |
入力画像のパス、出力結果のパスを設定します。
入力画像のパスは、マイドライブのpifuhdのsample_imagesにある画像データを指定しています。
|
1 2 3 4 5 6 7 8 9 10 11 12 13 |
import os # input path (you can upload and specify your own images) image_path = '/content/drive/My Drive/pifuhd/sample_images/data.png' image_dir = os.path.dirname(image_path) file_name = os.path.splitext(os.path.basename(image_path))[0] # output pathes obj_path = '/content/drive/My Drive/pifuhd/results/pifuhd_final/recon/result_data_256.obj' out_img_path = '/content/drive/My Drive/pifuhd/results/pifuhd_final/recon/result_data_256.png' video_path = '/content/drive/My Drive/pifuhd/results/pifuhd_final/recon/result_data_256.mp4' video_display_path = '/content/drive/My Drive/pifuhd/results/pifuhd_final/result_data_256.mp4' |
続いて、姿勢推定用のツールをダウンロードします。
|
1 |
!git clone https://github.com/Daniil-Osokin/lightweight-human-pose-estimation.pytorch.git |
ダウンロードしたフォルダに移動します。
|
1 |
cd /content/drive/My\ Drive/lightweight-human-pose-estimation.pytorch/ |
学習済みのパラメータをダウンロードします。
|
1 |
!wget https://download.01.org/opencv/openvino_training_extensions/models/human_pose_estimation/checkpoint_iter_370000.pth |
画像中の人を検知します。
|
1 2 3 4 5 6 7 8 9 10 11 12 13 14 15 16 17 18 19 20 21 22 23 24 25 26 27 28 29 30 31 32 33 34 35 36 37 38 39 40 41 42 43 44 45 46 47 48 49 50 51 52 53 54 55 56 57 58 59 60 61 62 63 64 65 66 67 68 69 70 71 72 |
import torch import cv2 import numpy as np from models.with_mobilenet import PoseEstimationWithMobileNet from modules.keypoints import extract_keypoints, group_keypoints from modules.load_state import load_state from modules.pose import Pose, track_poses import demo def get_rect(net, images, height_size): net = net.eval() stride = 8 upsample_ratio = 4 num_keypoints = Pose.num_kpts previous_poses = [] delay = 33 for image in images: rect_path = image.replace('.%s' % (image.split('.')[-1]), '_rect.txt') img = cv2.imread(image, cv2.IMREAD_COLOR) orig_img = img.copy() orig_img = img.copy() heatmaps, pafs, scale, pad = demo.infer_fast(net, img, height_size, stride, upsample_ratio, cpu=False) total_keypoints_num = 0 all_keypoints_by_type = [] for kpt_idx in range(num_keypoints): # 19th for bg total_keypoints_num += extract_keypoints(heatmaps[:, :, kpt_idx], all_keypoints_by_type, total_keypoints_num) pose_entries, all_keypoints = group_keypoints(all_keypoints_by_type, pafs, demo=True) for kpt_id in range(all_keypoints.shape[0]): all_keypoints[kpt_id, 0] = (all_keypoints[kpt_id, 0] * stride / upsample_ratio - pad[1]) / scale all_keypoints[kpt_id, 1] = (all_keypoints[kpt_id, 1] * stride / upsample_ratio - pad[0]) / scale current_poses = [] rects = [] for n in range(len(pose_entries)): if len(pose_entries[n]) == 0: continue pose_keypoints = np.ones((num_keypoints, 2), dtype=np.int32) * -1 valid_keypoints = [] for kpt_id in range(num_keypoints): if pose_entries[n][kpt_id] != -1.0: # keypoint was found pose_keypoints[kpt_id, 0] = int(all_keypoints[int(pose_entries[n][kpt_id]), 0]) pose_keypoints[kpt_id, 1] = int(all_keypoints[int(pose_entries[n][kpt_id]), 1]) valid_keypoints.append([pose_keypoints[kpt_id, 0], pose_keypoints[kpt_id, 1]]) valid_keypoints = np.array(valid_keypoints) # if leg is missing, use pelvis to get cropping if pose_entries[n][10] == -1.0 and pose_entries[n][13] == -1.0 and pose_entries[n][8] != -1.0 and pose_entries[n][11] != -1.0: center = (0.5 * (pose_keypoints[8] + pose_keypoints[11])).astype(np.int) radius = int(1.45*np.sqrt(((center[None,:] - valid_keypoints)**2).sum(1)).max(0)) center[1] += int(0.05*radius) else: pmin = valid_keypoints.min(0) pmax = valid_keypoints.max(0) center = (0.5 * (pmax[:2] + pmin[:2])).astype(np.int) radius = int(0.65 * max(pmax[0]-pmin[0], pmax[1]-pmin[1])) x1 = center[0] - radius y1 = center[1] - radius rects.append([x1, y1, 2*radius, 2*radius]) np.savetxt(rect_path, np.array(rects), fmt='%d') net = PoseEstimationWithMobileNet() checkpoint = torch.load('checkpoint_iter_370000.pth', map_location='cpu') load_state(net, checkpoint) get_rect(net.cuda(), [image_path], 512) |
ダウンロードしたpifuhdのフォルダに移動します。
|
1 |
cd /content/drive/My\ Drive/pifuhd |
学習済みモデルをダウンロードします。
|
1 |
!sh ./scripts/download_trained_model.sh |
画像データを変換します。
|
1 |
!python -m apps.simple_test -r 256 --use_rect -i $image_dir |
pifuhd実行に必要なライブラリをインストールします。
|
1 |
!pip install 'git+https://github.com/facebookresearch/pytorch3d.git@stable' |
画像データの変換を行います。
|
1 2 3 4 5 6 7 8 |
from lib.colab_util import generate_video_from_obj, set_renderer, video renderer = set_renderer() generate_video_from_obj(obj_path, out_img_path, video_path, renderer) # we cannot play a mp4 video generated by cv2 !ffmpeg -i $video_path -vcodec libx264 $video_display_path -y -loglevel quiet video(video_display_path) |
出力結果
出力結果は、以下のようになりました。下記のサイトの画像データを使用しています。
- pixabay( https://pixabay.com/ja/ )
- フリー素材ぱくたそ(www.pakutaso.com)
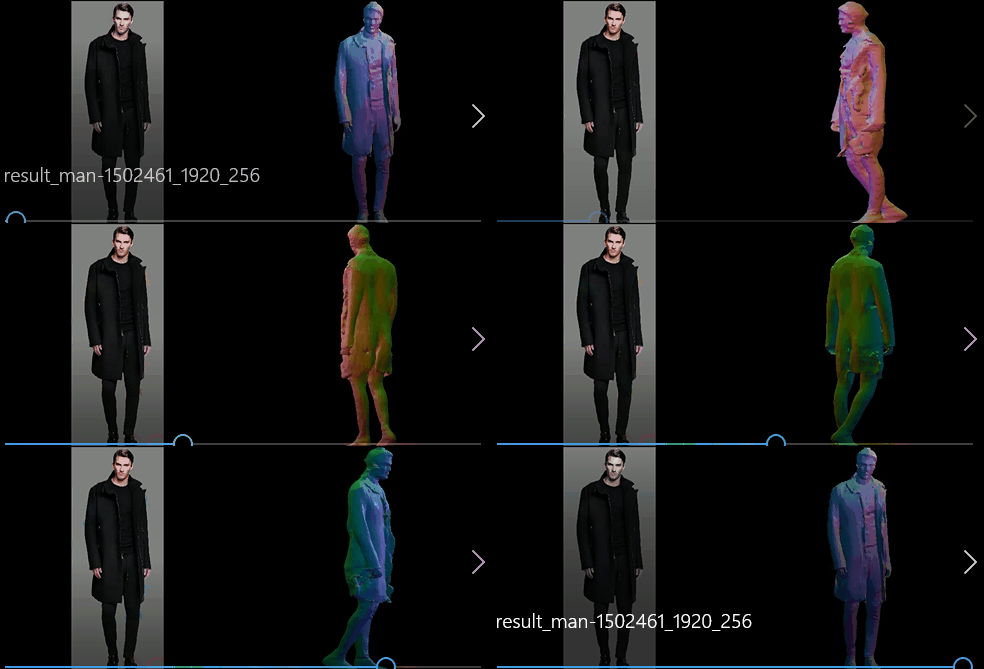
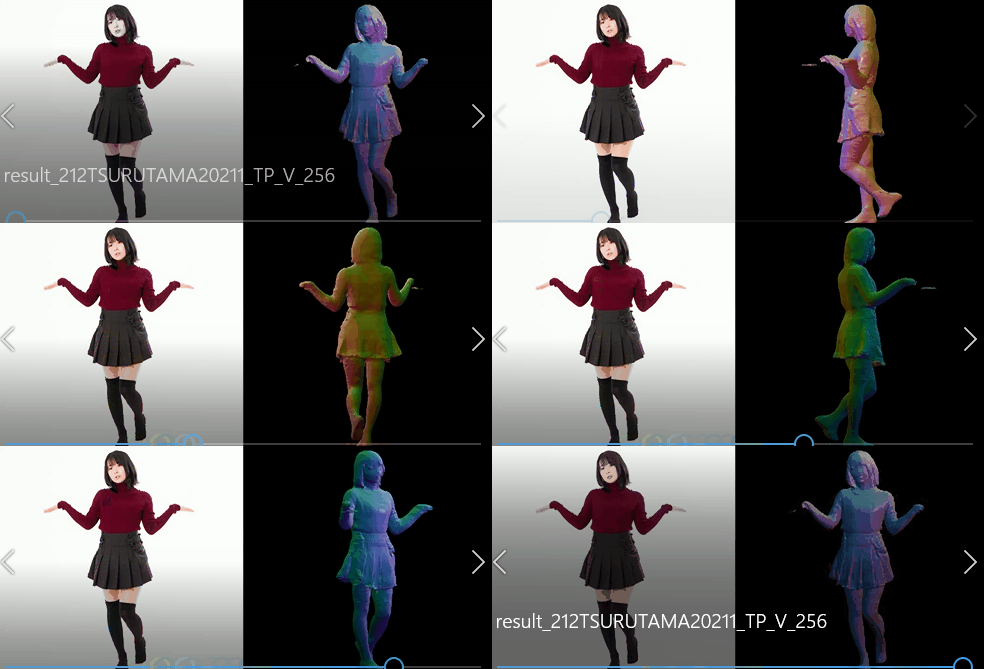
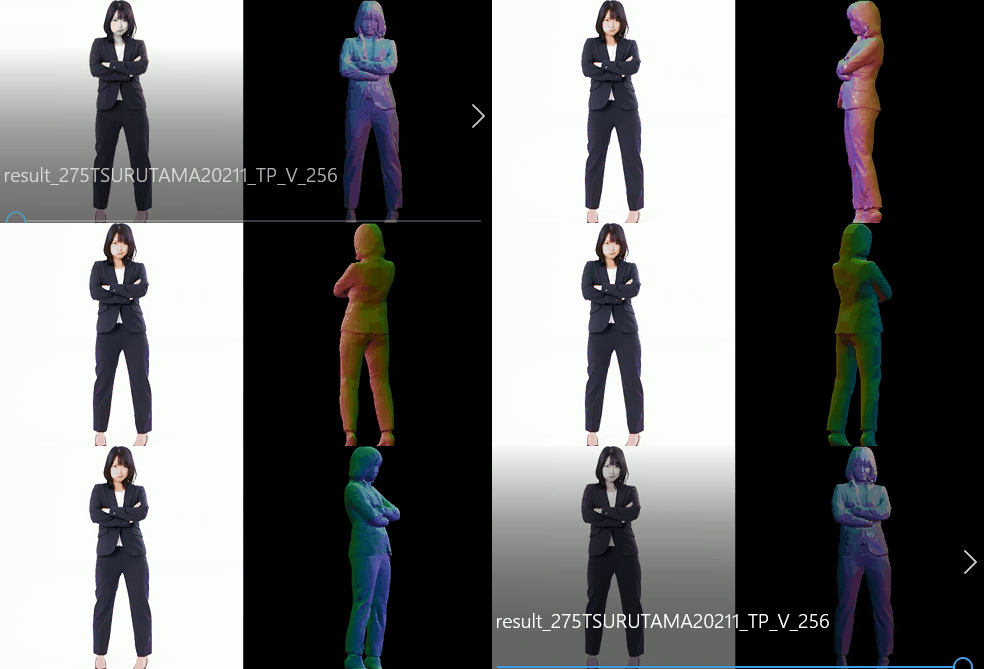
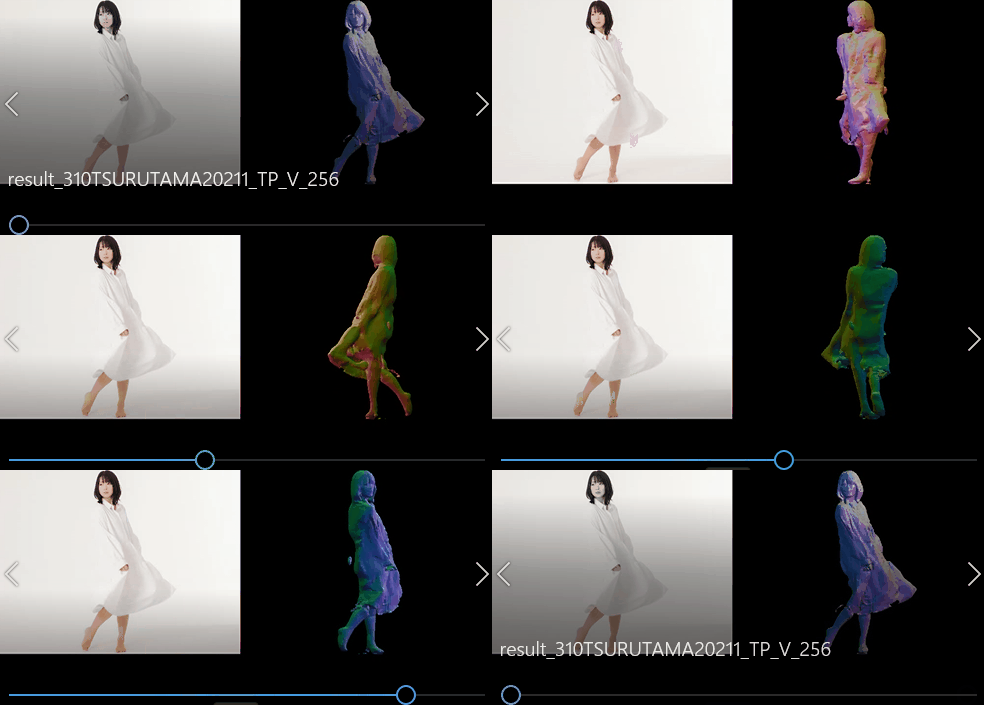
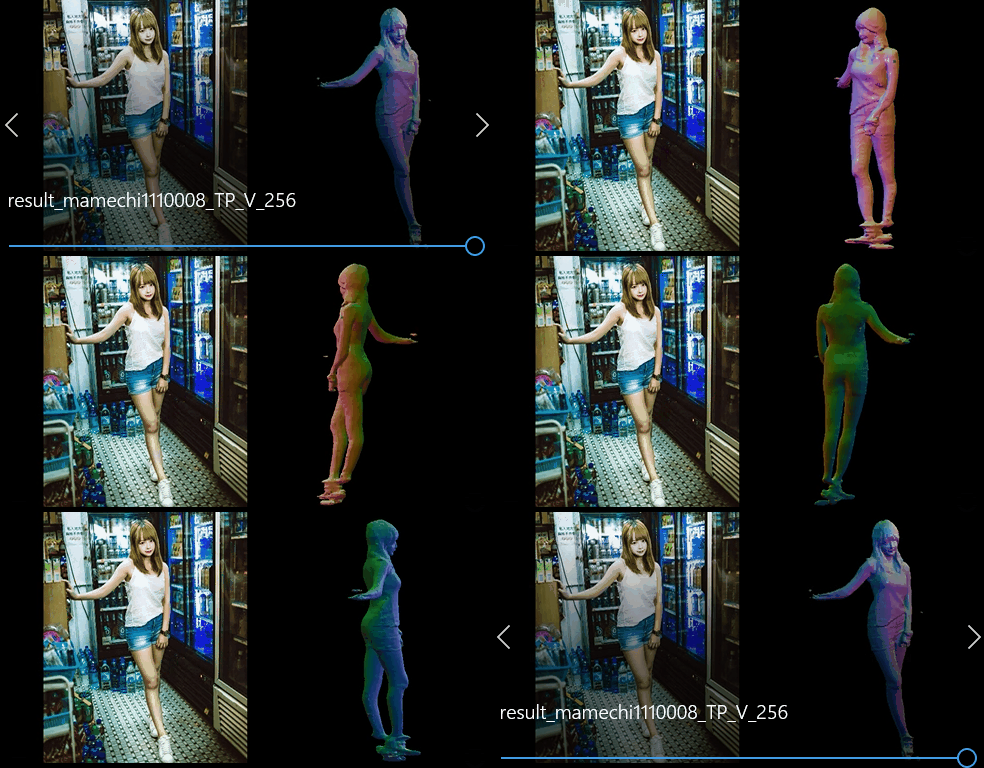
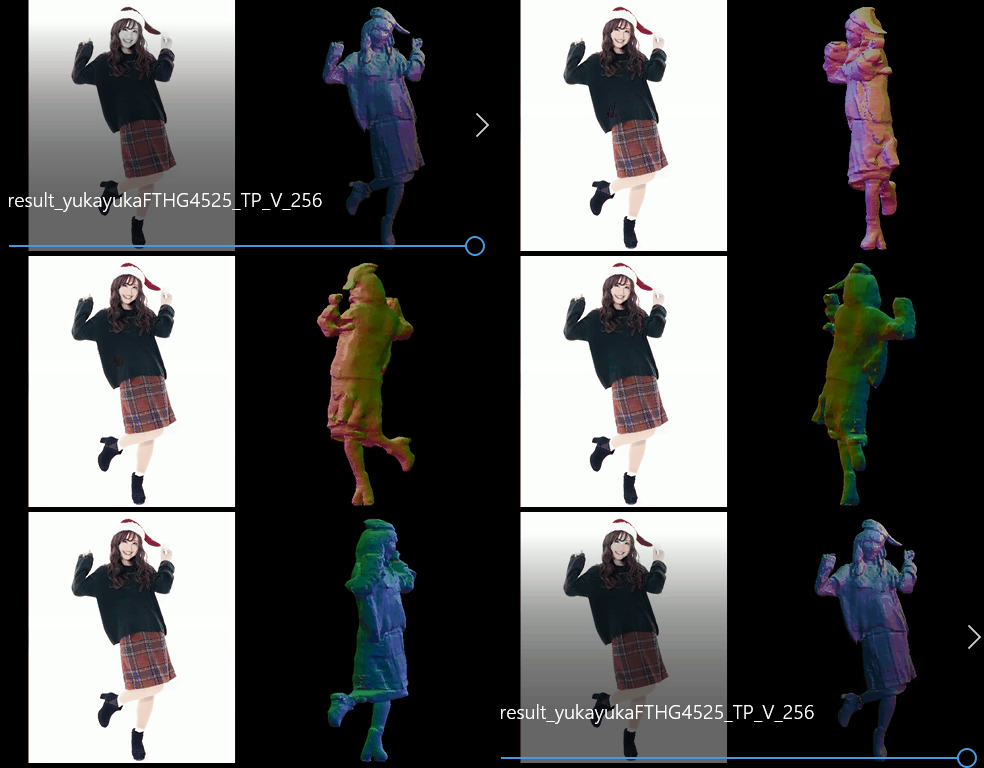
2D画像に移る人物を3Dオブジェクトに変換してみました。これほど簡単にできることに驚きです。
twitterにて出力結果が複数挙げられているそうなので、何が成功して何が失敗しやすいのか確認することができますので参考にしてみてはいかがでしょうか。
