Pythonで画像認識してみたいです。
このような要望にお応えします。
今回は、DETR(Detection Transformer)の学習済みモデルを用いた物体検知をします。
下記のサイトを参考にさせていただきました。
- https://github.com/facebookresearch/detr
- https://ai.facebook.com/research/publications/end-to-end-object-detection-with-transformers
- https://medium.com/lsc-psd/%E8%87%AA%E7%84%B6%E8%A8%80%E8%AA%9E%E5%87%A6%E7%90%86%E3%81%AE%E5%B7%A8%E7%8D%A3-transformer-%E3%81%AEself-attention-layer%E7%B4%B9%E4%BB%8B-a04dc999efc5
DETR(Detection Transformerについて
DETRは、自然言語処理の分野で有名なtransformerを物体検知に使用したモデルです。
transformerについては、以下のページがわかりやすいと思います。
- https://medium.com/lsc-psd/%E8%87%AA%E7%84%B6%E8%A8%80%E8%AA%9E%E5%87%A6%E7%90%86%E3%81%AE%E5%B7%A8%E7%8D%A3-transformer-%E3%81%AEself-attention-layer%E7%B4%B9%E4%BB%8B-a04dc999efc5
DETRのモデル、学習方法については、公式の論文を参照ください。
- https://ai.facebook.com/research/publications/end-to-end-object-detection-with-transformers
今回は、下記で公開されている学習済みDETRモデルを用いて人物画像生成をします。
- https://github.com/facebookresearch/detr
Google Colaboratoryの準備
・Googleのアカウントを作成します。
・Googleドライブにアクセスし、「新規」→「その他」から「Google Colaboratory」の順でクリックします。そうすると、Colaboratoryが起動します。
・Colaboratoryが起動したら、以下のコマンドをCoalboratoryのセルに入力し実行します。
そうすることで、Googleドライブをマウントします。
|
1 2 |
from google.colab import drive drive.mount('/content/drive') |
・実行後、認証コードの入力が促されます。このとき、「Go to this URL in a browser」が指しているURLにアクセスしgoogleアカウントを選択すると、認証コードが表示されますので、それをコピーしenterを押します。これでGoogleドライブのマウントが完了します。
DETR学習済みモデルの準備
Google Colaboratoryの「ランタイム」→「ランタイムのタイプ変更」でGPUを選択します。
ツールをダウンロードする場所に移動します。
本記事では、マイドライブにツールをダウンロードします。
|
1 |
cd /content/drive/My Drive |
gitからツールをダウンロードします。
|
1 |
!git clone https://github.com/facebookresearch/detr.git |
ダウンロードしたフォルダまで移動します。
|
1 |
cd detr/ |
画像データを格納するdataフォルダと物体検知の結果を保存するresultsフォルダを作成します。
|
1 2 |
!mkdir data !mkdir results |
DETR学習済みモデルをダウンロードします。
|
1 2 3 4 5 6 7 |
detr = DETRdemo(num_classes=91) state_dict = torch.hub.load_state_dict_from_url( url='https://dl.fbaipublicfiles.com/detr/detr_demo-da2a99e9.pth', map_location='cpu', check_hash=True) detr.load_state_dict(state_dict) detr.eval(); |
DETRのモデルを定義します。詳しくは、DETRのgithubを参照ください。
|
1 2 3 4 5 6 7 8 9 10 11 12 13 14 15 16 17 18 19 20 21 22 23 24 25 26 27 28 29 30 31 32 33 34 35 36 37 38 39 40 41 42 43 44 45 46 47 48 49 50 51 52 53 54 55 56 57 58 59 60 61 62 63 64 65 66 67 68 69 70 71 72 73 74 75 76 77 78 79 80 81 82 83 84 85 86 87 88 89 90 91 92 93 94 95 96 97 98 99 100 101 102 103 104 105 106 107 108 109 110 111 112 113 114 115 116 117 118 119 120 121 122 123 124 125 126 127 128 129 130 131 132 133 134 |
from PIL import Image import requests import matplotlib.pyplot as plt %config InlineBackend.figure_format = 'retina' import torch from torch import nn from torchvision.models import resnet50 import torchvision.transforms as T torch.set_grad_enabled(False); class DETRdemo(nn.Module): """ Demo DETR implementation. Demo implementation of DETR in minimal number of lines, with the following differences wrt DETR in the paper: * learned positional encoding (instead of sine) * positional encoding is passed at input (instead of attention) * fc bbox predictor (instead of MLP) The model achieves ~40 AP on COCO val5k and runs at ~28 FPS on Tesla V100. Only batch size 1 supported. """ def __init__(self, num_classes, hidden_dim=256, nheads=8, num_encoder_layers=6, num_decoder_layers=6): super().__init__() # create ResNet-50 backbone self.backbone = resnet50() del self.backbone.fc # create conversion layer self.conv = nn.Conv2d(2048, hidden_dim, 1) # create a default PyTorch transformer self.transformer = nn.Transformer( hidden_dim, nheads, num_encoder_layers, num_decoder_layers) # prediction heads, one extra class for predicting non-empty slots # note that in baseline DETR linear_bbox layer is 3-layer MLP self.linear_class = nn.Linear(hidden_dim, num_classes + 1) self.linear_bbox = nn.Linear(hidden_dim, 4) # output positional encodings (object queries) self.query_pos = nn.Parameter(torch.rand(100, hidden_dim)) # spatial positional encodings # note that in baseline DETR we use sine positional encodings self.row_embed = nn.Parameter(torch.rand(50, hidden_dim // 2)) self.col_embed = nn.Parameter(torch.rand(50, hidden_dim // 2)) def forward(self, inputs): # propagate inputs through ResNet-50 up to avg-pool layer x = self.backbone.conv1(inputs) x = self.backbone.bn1(x) x = self.backbone.relu(x) x = self.backbone.maxpool(x) x = self.backbone.layer1(x) x = self.backbone.layer2(x) x = self.backbone.layer3(x) x = self.backbone.layer4(x) # convert from 2048 to 256 feature planes for the transformer h = self.conv(x) # construct positional encodings H, W = h.shape[-2:] pos = torch.cat([ self.col_embed[:W].unsqueeze(0).repeat(H, 1, 1), self.row_embed[:H].unsqueeze(1).repeat(1, W, 1), ], dim=-1).flatten(0, 1).unsqueeze(1) # propagate through the transformer h = self.transformer(pos + 0.1 * h.flatten(2).permute(2, 0, 1), self.query_pos.unsqueeze(1)).transpose(0, 1) # finally project transformer outputs to class labels and bounding boxes return {'pred_logits': self.linear_class(h), 'pred_boxes': self.linear_bbox(h).sigmoid()} # COCO classes CLASSES = [ 'N/A', 'person', 'bicycle', 'car', 'motorcycle', 'airplane', 'bus', 'train', 'truck', 'boat', 'traffic light', 'fire hydrant', 'N/A', 'stop sign', 'parking meter', 'bench', 'bird', 'cat', 'dog', 'horse', 'sheep', 'cow', 'elephant', 'bear', 'zebra', 'giraffe', 'N/A', 'backpack', 'umbrella', 'N/A', 'N/A', 'handbag', 'tie', 'suitcase', 'frisbee', 'skis', 'snowboard', 'sports ball', 'kite', 'baseball bat', 'baseball glove', 'skateboard', 'surfboard', 'tennis racket', 'bottle', 'N/A', 'wine glass', 'cup', 'fork', 'knife', 'spoon', 'bowl', 'banana', 'apple', 'sandwich', 'orange', 'broccoli', 'carrot', 'hot dog', 'pizza', 'donut', 'cake', 'chair', 'couch', 'potted plant', 'bed', 'N/A', 'dining table', 'N/A', 'N/A', 'toilet', 'N/A', 'tv', 'laptop', 'mouse', 'remote', 'keyboard', 'cell phone', 'microwave', 'oven', 'toaster', 'sink', 'refrigerator', 'N/A', 'book', 'clock', 'vase', 'scissors', 'teddy bear', 'hair drier', 'toothbrush' ] # colors for visualization COLORS = [[0.000, 0.447, 0.741], [0.850, 0.325, 0.098], [0.929, 0.694, 0.125], [0.494, 0.184, 0.556], [0.466, 0.674, 0.188], [0.301, 0.745, 0.933]] # standard PyTorch mean-std input image normalization transform = T.Compose([ T.Resize(800), T.ToTensor(), T.Normalize([0.485, 0.456, 0.406], [0.229, 0.224, 0.225]) ]) # for output bounding box post-processing def box_cxcywh_to_xyxy(x): x_c, y_c, w, h = x.unbind(1) b = [(x_c - 0.5 * w), (y_c - 0.5 * h), (x_c + 0.5 * w), (y_c + 0.5 * h)] return torch.stack(b, dim=1) def rescale_bboxes(out_bbox, size): img_w, img_h = size b = box_cxcywh_to_xyxy(out_bbox) b = b * torch.tensor([img_w, img_h, img_w, img_h], dtype=torch.float32) return b def detect(im, model, transform): # mean-std normalize the input image (batch-size: 1) img = transform(im).unsqueeze(0) # propagate through the model outputs = model(img) # keep only predictions with 0.7+ confidence probas = outputs['pred_logits'].softmax(-1)[0, :, :-1] keep = probas.max(-1).values > 0.7 # convert boxes from [0; 1] to image scales bboxes_scaled = rescale_bboxes(outputs['pred_boxes'][0, keep], im.size) return probas[keep], bboxes_scaled |
これで、モデルの定義は完了です。
以下のPythonスクリプトでdataフォルダ内の画像を読み込み、物体検知した結果をresultsフォルダに保存することができます。
|
1 2 3 4 5 6 7 8 9 10 11 12 13 14 15 16 17 18 19 20 21 22 23 24 25 26 27 28 29 30 31 32 33 |
import glob files = glob.glob('data/*.jpg') def plot_results(pil_img, prob, boxes, save_name): fig = plt.figure() plt.figure(figsize=(16,10)) plt.imshow(pil_img) ax = plt.gca() for p, (xmin, ymin, xmax, ymax), c in zip(prob, boxes.tolist(), COLORS * 100): ax.add_patch(plt.Rectangle((xmin, ymin), xmax - xmin, ymax - ymin, fill=False, color=c, linewidth=3)) cl = p.argmax() text = f'{CLASSES[cl]}: {p[cl]:0.2f}' ax.text(xmin, ymin, text, fontsize=10, bbox=dict(facecolor='yellow', alpha=0.5)) plt.axis('off') #fig.savefig("img.jpg") plt.savefig("results/"+save_name) plt.show() for index, file in enumerate(files): print(file) im = Image.open(file) w, h = im.size print(w, h) if w >= 1000 and h >= 1000: scores, boxes = detect(im, detr, transform) plot_results(im, scores, boxes, 'result'+str(index)+'.jpg') print('convert') else: print('not result') |
出力結果
出力結果は、以下になります。
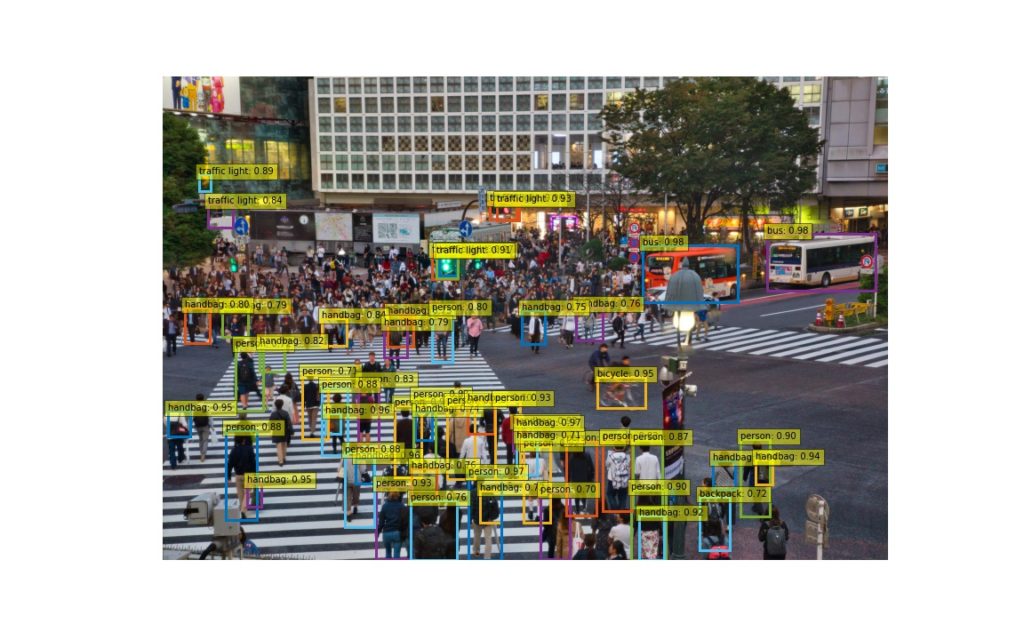
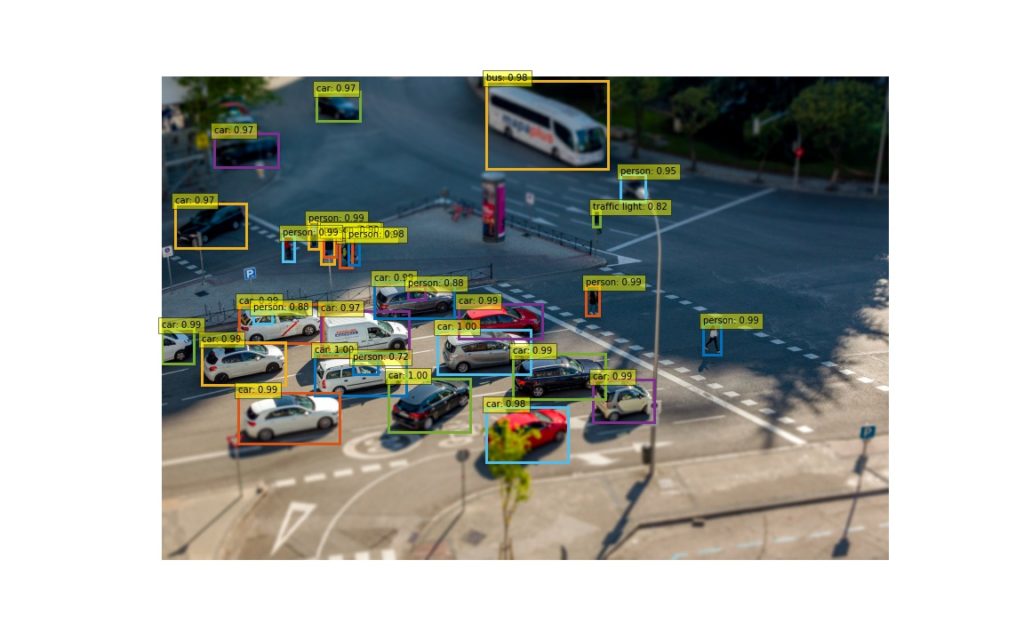
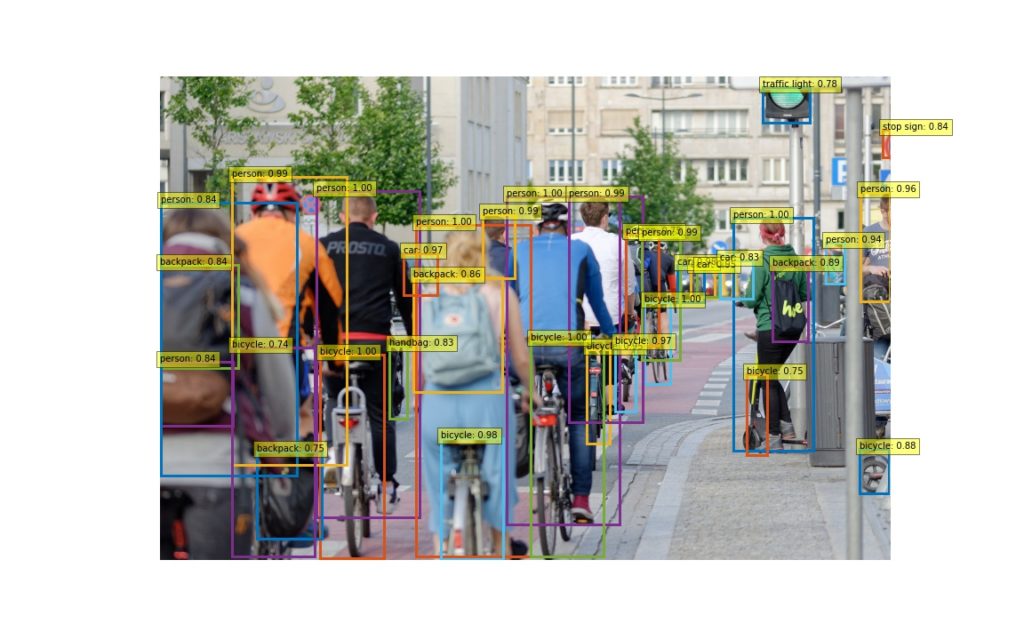
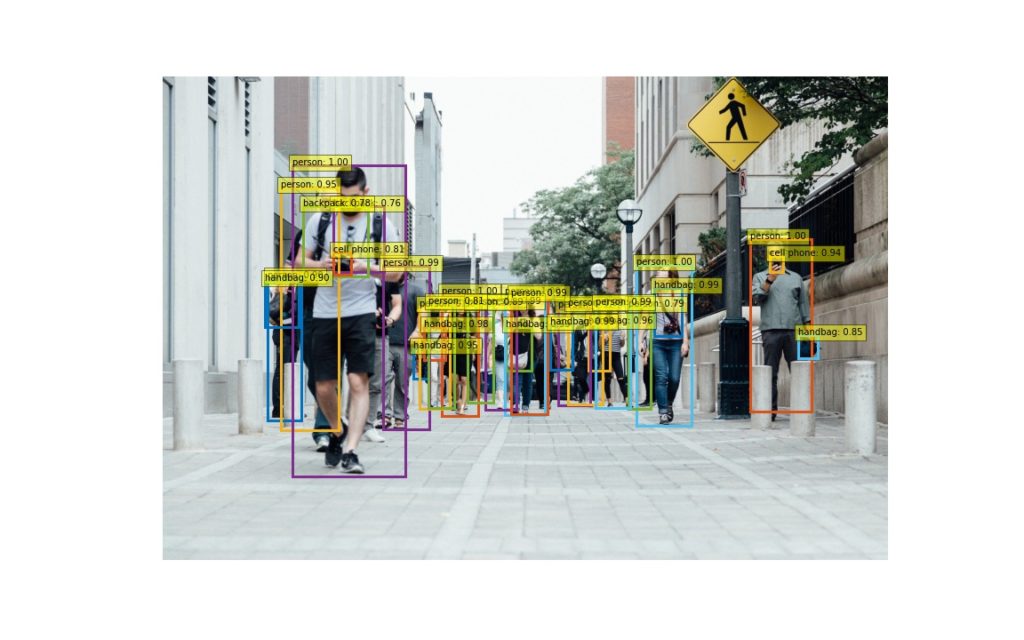
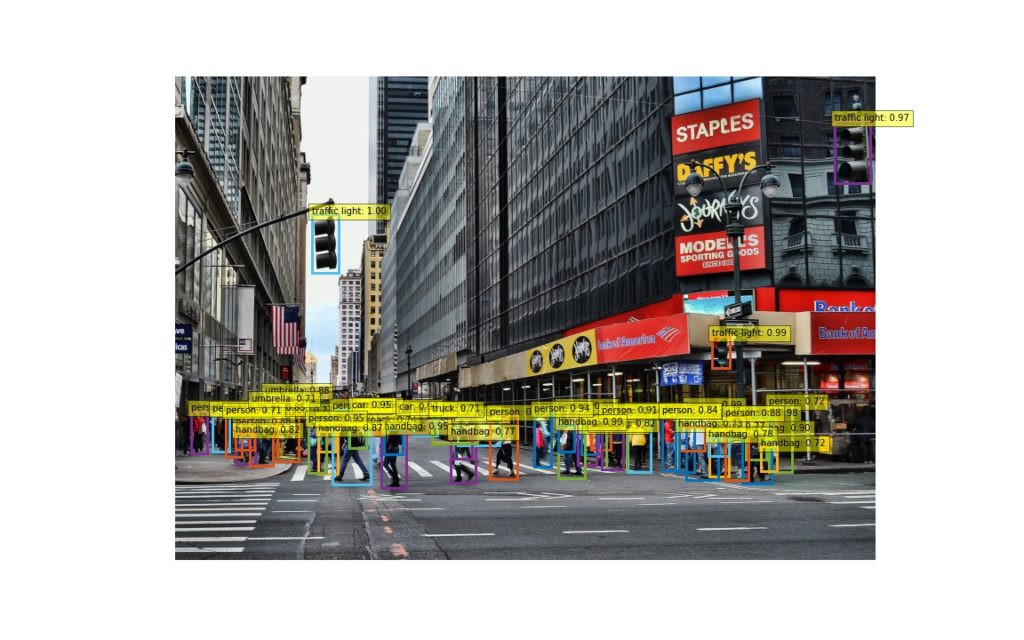
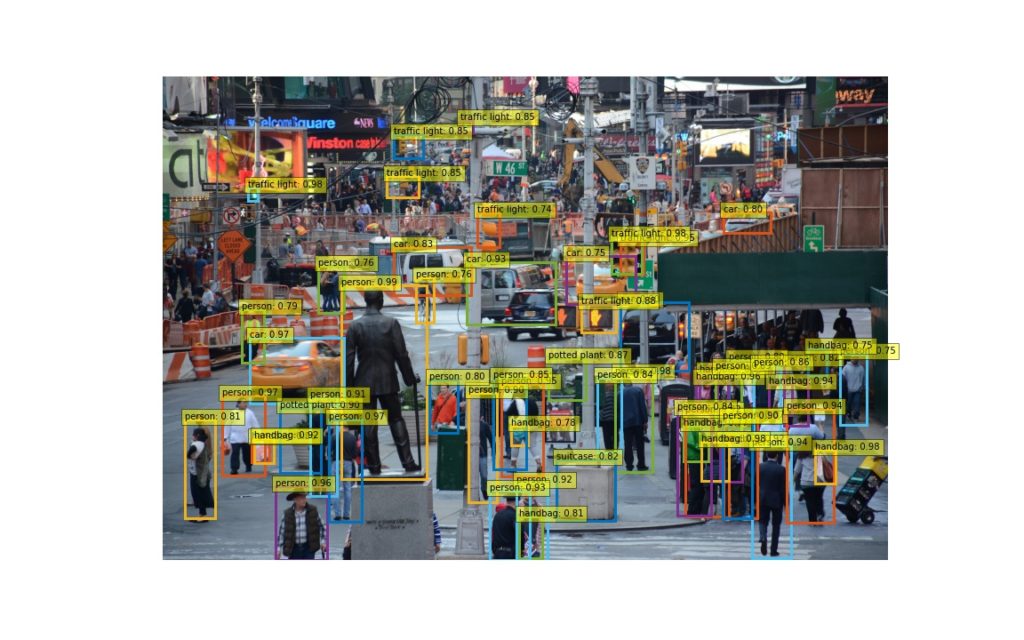
どうでしょうか? 様々な要素が混じる複雑な画像に対して実施してみるのもいいかもしれません。
